
Studio Mixer has had a big update, and there's a whole lot in it. It has a fantastic new, tidy layout. Changing the volume with keyframes is now much more convenient than before. And video export is finally where it belongs: right at the front.
Drag your video in, put music and voice underneath and export everything as a finished MP4. Afterwards, you clear out unused recordings with two clicks. It all runs right in your browser, free and without an account. Your files never leave your device.
Video export: add sound to your video right in your browser
Until now, video export was well hidden. It only showed up once you'd already loaded a video, and even then just as a small option in the export area. Now it makes its big entrance.
Here's how to add sound to your video:
- Drag your video into the “Video” area on the right. From then on, it stays in lockstep with the timeline as you play, pause and jump.
- In the timeline, your video gets its own row with a filmstrip and the file name. That way you can always see where your film starts and ends.
- Put music, speech and sound effects on the tracks below. If you want, you can bring the video's original audio onto a track at the same time.
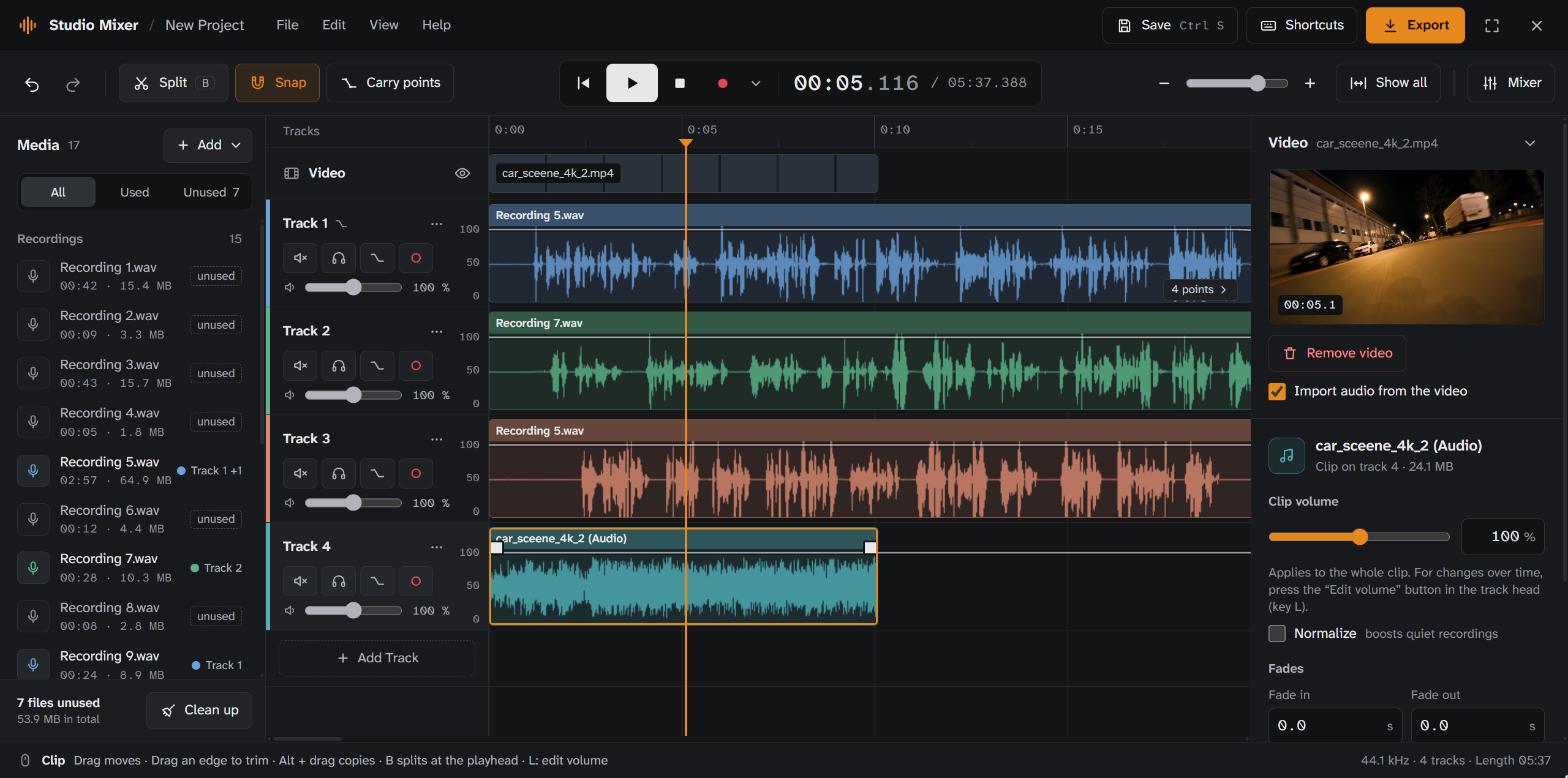
Once everything's mixed, click “Export” and choose “Audio and video”. You can pick from MP4, WebM and MOV. MP4 plays almost everywhere, including on video platforms like YouTube. MOV is a good fit for Apple devices and editing software, WebM for websites.
Before you export, you see which tracks end up in the film with the video, and “Normalize” makes your mix as loud as possible without distorting it. Everything is rendered in your browser. Nothing gets uploaded.
Clean up your project: out with unused recordings
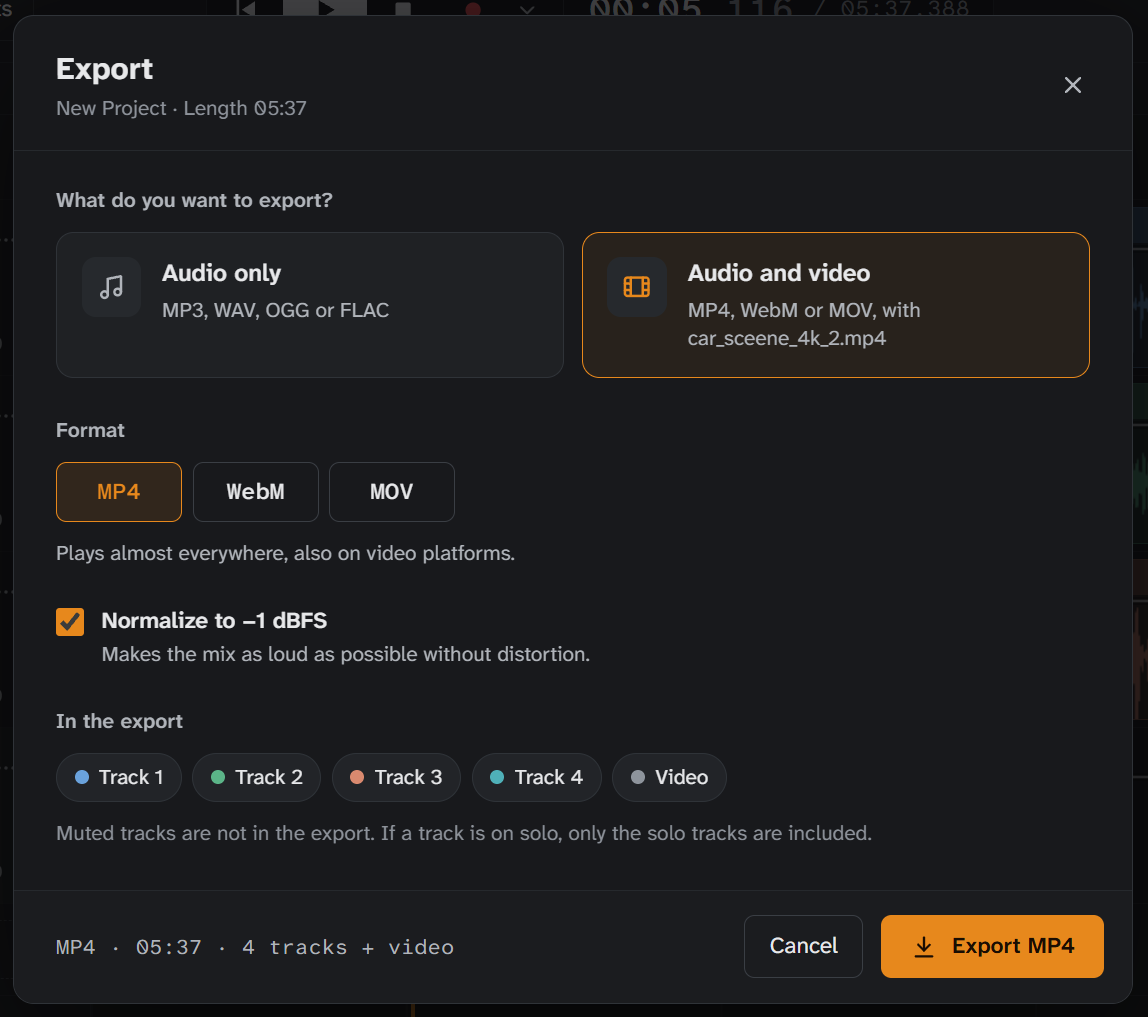
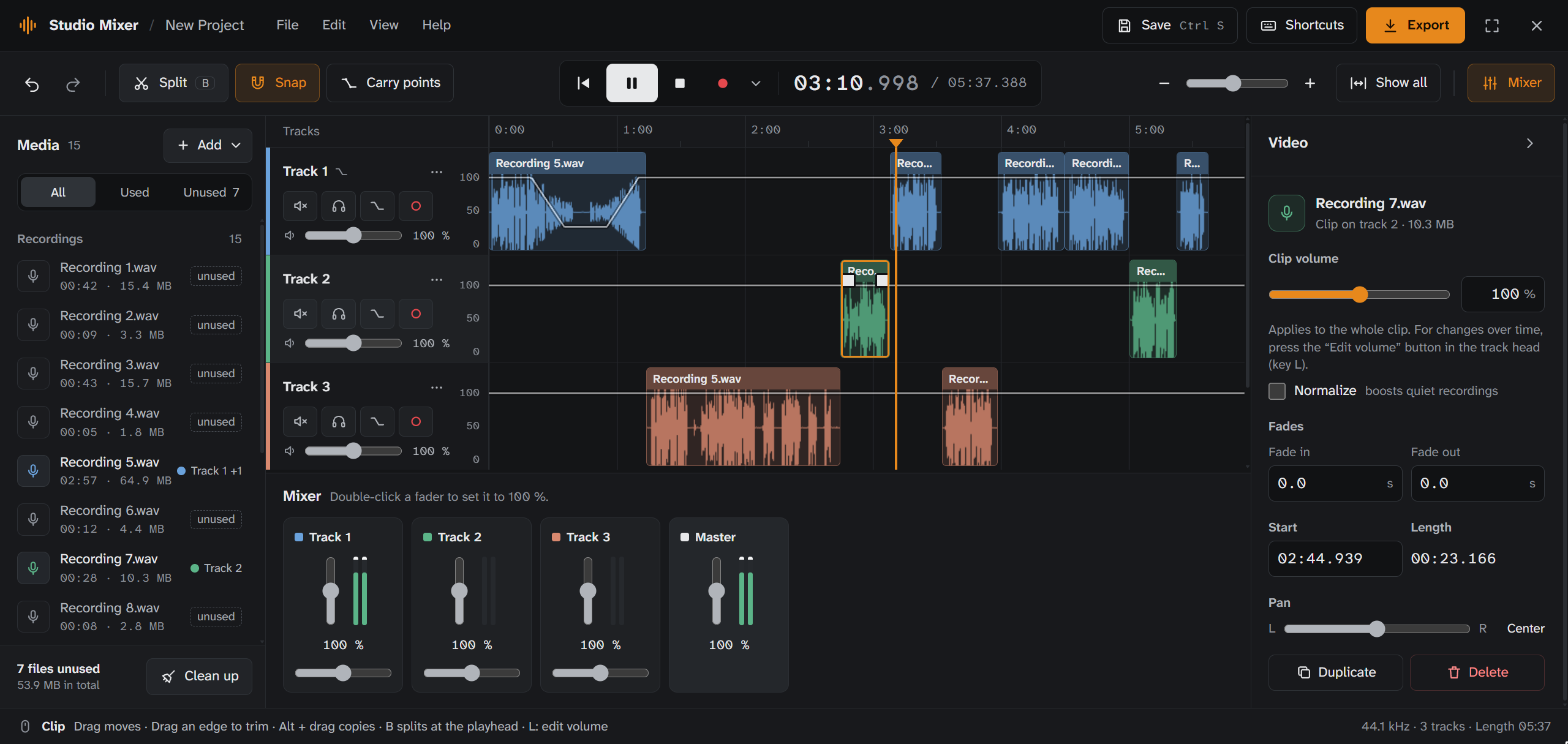
If you record a lot, you know how it goes: after a session, the list shows Recording 1 to Recording 15, but only a few of them make it into the mix. The media list now shows you which track each file is on. Everything else gets the label “unused”, and a filter shows you exactly those files.
One click on “Clean up” lists everything unused, and a second one throws it out. Beforehand, you see how much space that frees up. In the picture, it's 7 recordings with 53.9 MB in total. If you've made a mistake, Undo brings everything back. And because recordings only exist in your project, the mixer offers to let you download them as a ZIP first.
A fantastic new layout
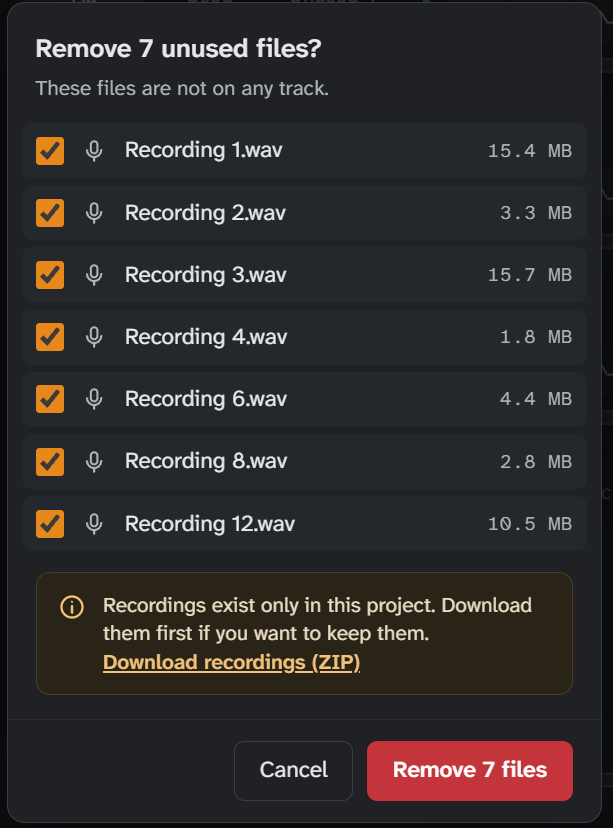
Everything now has a fixed place. Your media is on the left, the timeline is in the middle, and on the right are the properties of whatever you've just clicked: a clip, a track or a volume point. Below that sits the mixer. It now shows a level meter for every track and has a master fader for the whole mix.
Studio Mixer is dark grey, and ENDE orange shows you what's active right now. At the very bottom, a hint line tells you what you can do with the mouse and keys. If you need more space, hide the mixer or switch to full screen.
Volume keyframes: much more convenient than before
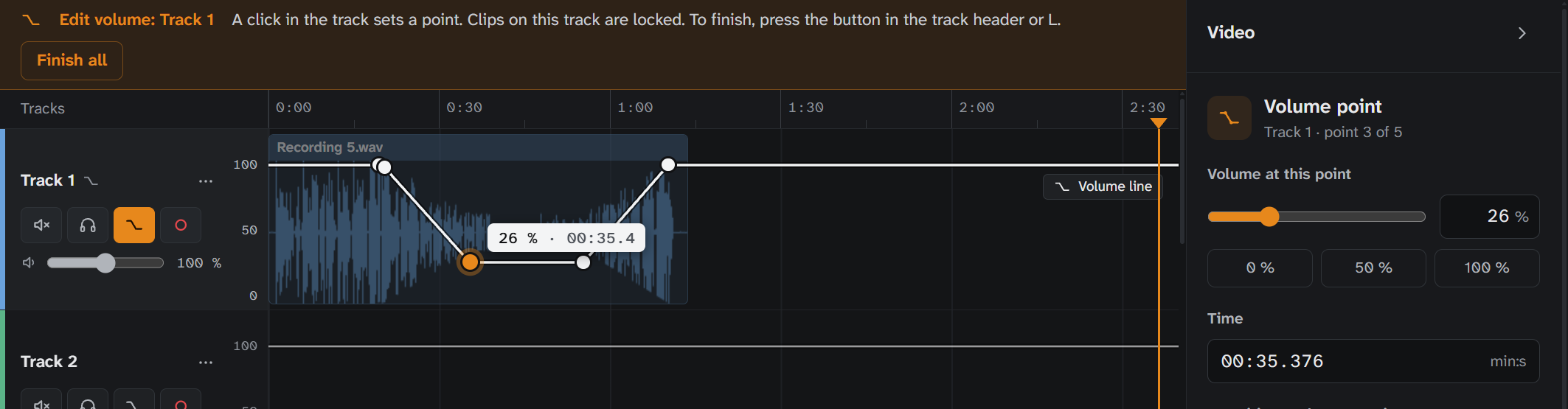
Press “Edit volume” in the track head, or simply L. Just like that, the volume appears as a line right on the track, and you shape it with the mouse:
- A click sets a point.
- Drag up to make it louder, down to make it quieter. Drag sideways to move the point in time.
- A double-click or Del deletes it.
- Press L again and you're done.
The best part: the waveform follows the line. You see right away where it gets quieter. While you're setting points, the track's clips are locked so nothing slips out of place by accident. And for each point, you decide whether the volume glides smoothly or jumps abruptly.
The mixer keeps an eye on your keyframes
I ran into this myself while testing: a single point at 0% muted an entire track, and I didn't notice. That's because the first point's value also applies before it. So the mixer now lends a hand:
- When you set the first point on a track, a point at 100% is added automatically 1 second before it. The track stays loud until your change begins.
- If the line silences a clip completely, the clip shows its own icon.
- If points are outside the view, a hint at the edge such as “2 points →” shows where they are. One click takes you there.
- With “Carry points” in the toolbar, the points come along when you move or copy a clip.
All keyboard shortcuts at a glance
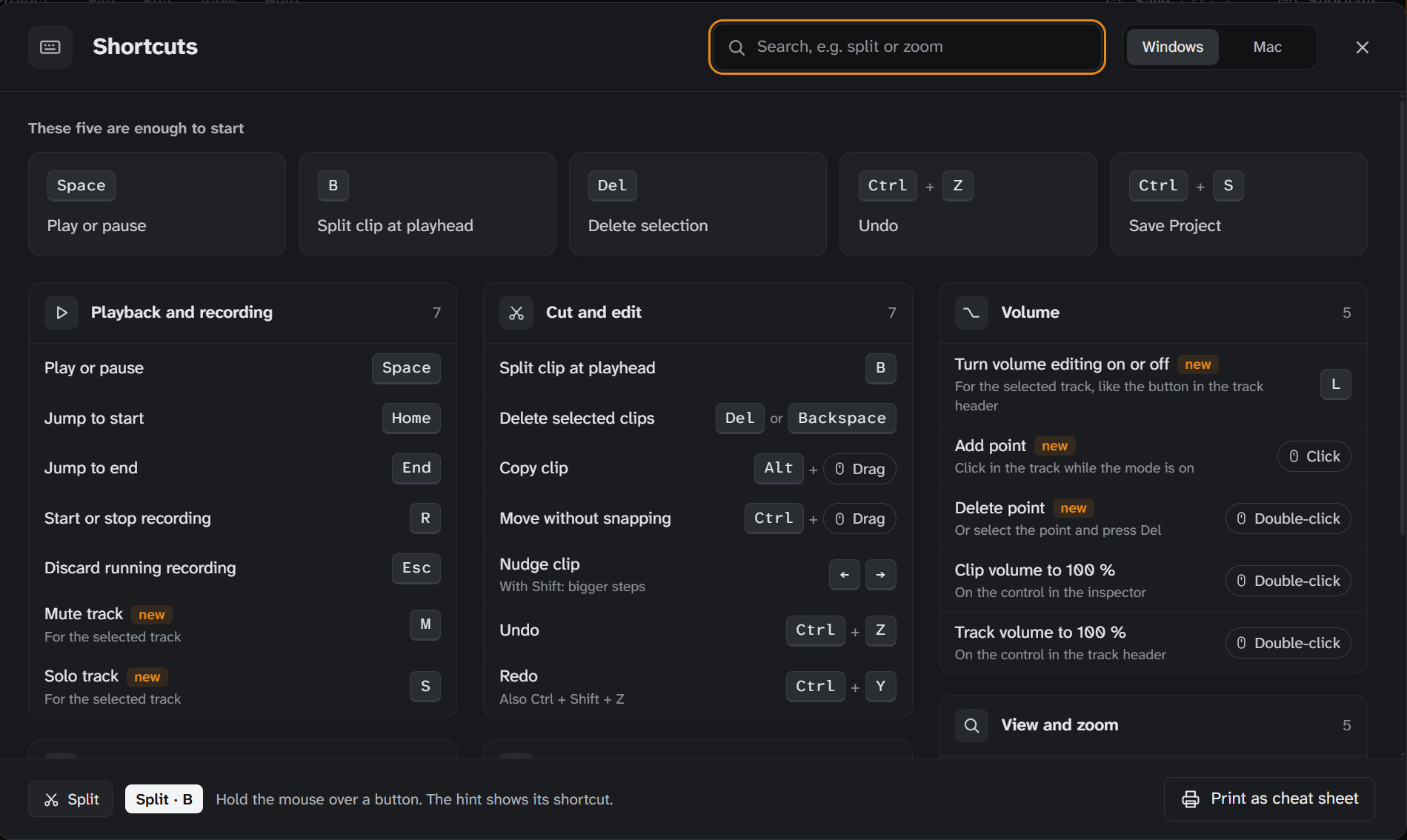
Pressing ? opens the new overview. Right at the top are the five shortcuts that get you going straight away. You can search, switch to Mac keys and print it all out as a cheat sheet.
Also new: M mutes the selected track, S solos it, and L starts the volume keyframes. Hover the mouse over a button and it reveals its shortcut.
And a few fewer bugs
- Undo during playback no longer mutes clips that are playing.
- Faders, mute and solo leave running fades alone.
- Autosave no longer loses a file whose removal you've undone.
- If the mixer is open in two tabs, only one of them autosaves. The other one lets you know.
- In narrow windows around 800 pixels wide, the video preview no longer covers the toolbar.
Try it out
Start Studio Mixer, drag your video in, get started. You'll find the right music for your film here on ENDE.APP, royalty-free under CC BY 4.0.
Is something missing, or do you have an idea? Write to me through the contact page.